Define Actions for Events or Event Patterns
An action can be triggered when an event occurs or when event pattern's conditions are met or not met.
Actions for an event or an event pattern can be defined, while defining the event or the event pattern.
Action types
- Trigger re-segmentation
- Log offer contact
- Log offer acceptance
- Log offer rejection
- Trigger userexpression
- Trigger events
- Suppress offers
- Qualify segments
Delay of invoking an action
Interact supports the delay of invoking actions. This feature provides marketers the ability to control when to invoke actions.
An action can be invoked in three ways:
- Immediately
- After a duration
- At the scheduled date and time
Conditions for invoking an action
Adding conditions to an action gives marketers another control on whether an action is invoked. Only when specified set of conditions are met, then the action will be invoked. Conditions are optional settings for an action. This applies to all types of actions.
Actions tab in Design Time UI
Actions tab in Add/Edit event dialog or Add/Edit event pattern dialog is the user interface where actions are created and managed.
Actions tab in Add/Edit event dialog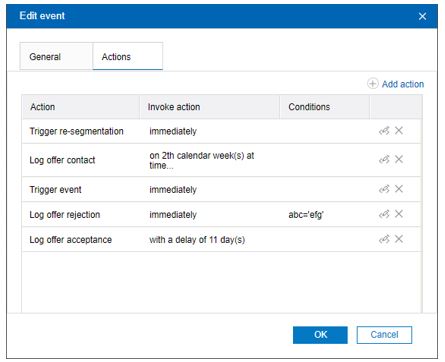
Actions tab in event pattern dialog
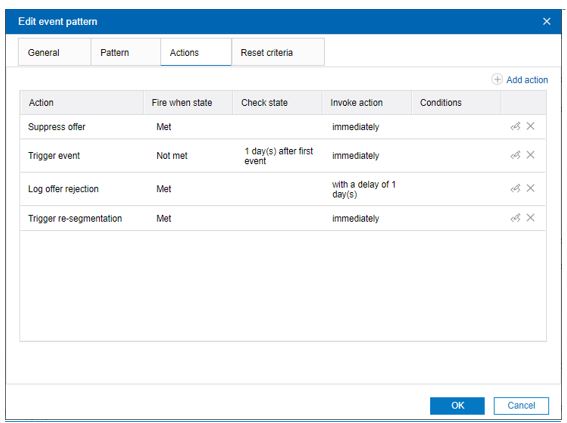
You can edit an action by clicking the Edit icon located in the row on the Actions tab.
You can delete an action by clicking the Delete icon located in the row on the Actions tab.
You can save the Action data with the event or event pattern definition by clicking OK.
Events, logging, and the Unica Interact API
If you create an event with more than one log offer action, the Unica Interact API completes the same action for the associated offer. For this reason, do not create an event that logs both offer acceptance and offer rejection since they contradict each other. However, creating a single event to log offer contact and acceptance or offer contact and rejection can be useful in your environment.
By default, the runtime environment can track two types of responses, offer acceptance and offer rejection. You can modify the response types that the Log Offer Acceptance and Log Offer Rejection events record by setting the accept and reject configuration properties.
The Unica Interact API can also use events to trigger actions that you define by using event parameters in the API. These events include logging to a custom table, tracking multiple response types, and specifying a specific flowchart to run. You might have to create some events with no defined System Reaction, or several with the same System Reaction, such as Log Contact, for use with the reserved event parameters.
You might want to create several events with the Log Offer Acceptance action, one for every response type you want to log, or a single event with the Log Offer Acceptance action you use for every postEvent call you use to log separate response types.
For example, create an event with the Log Offer Acceptance action for each type of response. You define the following custom responses in the UA_UsrResponseType table [as Name (code)]: Explore (EXP), Consider (CON), and Commit (CMT). You then create three events and name them LogAccept_Explore, LogAccept_Consider, and LogAccept_Commit. All three events are the same (have the Log Offer Acceptance action), but the names are different so that the person who works with the Unica Interact API can distinguish between them.
Or, you might create a single event with the Log Offer Acceptance action that you use for all custom response types. For example, name it LogCustomResponse.
When you are working with the Unica Interact API, there is no functional difference between the events, but the naming conventions can make the code clearer. Also, if you give each custom response a separate name, the Channel Event Activity Summary report displays more accurate information.
You can use your own custom contact code to be used in postEvent calls. To achieve this, you need to add a new Contact Status Code in UA_ContactStatus and make use of that whenever a contact event is posted. You can even define the Custom Contact codes under RunTime configuration. The action added on UI for custom contact code will override the action of that in System table.
Example:
You have added a custom entry in Campaign System Table UA_ContactStatus for contact status code as “OPEN" and “1" in CountasContact column. On UI, under configuration settings Interact | services | contactHist | contactStatusCodes, if you add code as “OPEN" and action as “None", when “OPEN" contact status code is used in postEvent call, it will not be considered as true Contact. Thus, preference is given to what action you have set on UI than what action you have set in the UA_ContactStatus table.
For more information about reserved parameters and the postEvent method, see the Unica Interact Administrator's Guide.