Extracting data from a cell, table, or strategic segment
This procedure explains how to use the Extract process to obtain data from an input cell, such as a Select process, or from a single table or a strategic segment. In this way, you can pare down a large amount of data to a manageable size for subsequent operations, resulting in improved performance.
Before you begin
Procedure
-
Open a flowchart for editing (click Edit
 in the flowchart
toolbar).
in the flowchart
toolbar).
-
Drag the Extract process
 from the palette to your flowchart.
- Optionally, connect a configured process, such as a Select process, as input into the Extract process.
- Double-click the Extract process in the flowchart.
The Extract process configuration dialog opens and the Source tab is open by default.
- On the Source tab, use the Input list to select an input cell, a table, or a strategic segment. The Select based on list indicates your selection. If you selected a strategic segment, you must join it to a table by selecting a table from the Select based on list.
- Specify which records to select. If you want to include all records from the input data source, choose Select all records.
-
If you prefer to use a subset of IDs from the selected data source, choose Select
all records with, so you can do a query for the records that you want to extract.
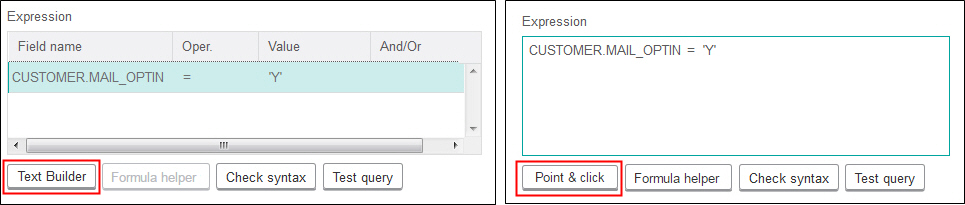
The Expression box shows columns labeled Field name, Oper, Value, and And/Or.
When the button says Text Builder, you can build expressions by populating the columns labeled Field name, Oper, Value, And/Or.
When the button says Point & click, you can view or edit raw SQL and you can use the Formula helper to pick macros, operators, and string functions from a list.
With either method (Text Builder or Point & click), you can select fields from the Available fields list, including Unica Campaign Generated Fields and Derived fields.
-
Construct a query to determine which records are selected:
You now have an expression that consists of a field name, operator, and value.
- Click Check syntax to confirm whether the query syntax is valid. Checking the syntax does not put any load on the database server.
-
To add and combine multiple expressions, follow the guidelines below:
- To add another expression, click the And/Or cell, then double-click AND or OR in the Values list to indicate how to combine the expressions.
- Build your next expression, consisting of a field name, operator, and value.
- To add parentheses to control evaluation order, double-click the Field Name in any row to display the For selected expression list. In the list of expressions, double-click Add ( ) to add a set of parentheses, Remove ( ) to remove a single set of parentheses, or Clear all ( ) to remove all of the parentheses in the selected expression. Parentheses allow you to group expressions when defining complex queries. For example, (AcctType = 'Gold' AND Rank = 'A') OR NewCust = 'Yes' is different from AcctType = 'Gold' AND (Rank = 'A' OR NewCust = 'Yes').
- To reorder the selected expression, double-click Move up or Move down.
- To add a blank row below the selected expressions, double-click Insert.
- To delete the selected expression, double-click Delete.
-
Optionally, click the Text Builder button so its label changes to
Point & click. When the button says Point &
click, you can view or edit raw SQL. You can also use the Formula
helper to pick macros, operators, and string functions from a list.
Note: If your query includes a table field that has the same name as a Campaign generated field, you must qualify the field name. Use the following syntax:<table_name>.<field_name>.For related information, see Creating raw SQL queries. Also see Creating queries with Formula helper.
- Click the Point & click button to change back to the original query mode. The button label changes back to Text Builder.
-
(Optional) Use Test query to see how many IDs the query returns.
A progress bar is displayed while the query is being tested. Close the progress window if you want to cancel the test. When testing is complete, Unica Campaign indicates the number of rows the query returned.
Important: Global suppressions and cell size limits are not applied in test query counts. Test queries might also return non-normalized data. To obtain an accurate result count, test run the process. - Continue configuring the process, as described below, or click OK to close the process configuration dialog and save the query expression.
-
Optionally, use the Cell size limit tab to limit the number of IDs
generated by the process during production or test runs. See Limiting the size of output cells.
If you selected Random seed, in most cases you can accept the default seed. The random seed represents the starting point that Unica Campaign uses to select IDs randomly.
Note: The same random set of records will be used for each subsequent run of the Extract process (unless the input to the process changes). This is important if you intend to use the results for modeling purposes, because different modeling algorithms must be compared across the same set of records to determine each model's effectiveness. If you do not intend to use the results for modeling, you can make the Extract process select a different random set of records each time it runs. To do this, use a Random Seed of zero (0). A value of 0 ensures that a different random set of records will be selected each time the process runs. -
On the Extract tab, use the Target data source
field to select an output location:
- To store the data in binary format, select Unica Campaign Server.
- To store the data in a uniquely named table with a UAC_EX prefix, select an available database.
Then select fields from the list of Candidate fields and add them to the Fields to extract list. Use the controls to remove or reorder fields. For information about using the Extract tab, see Extract tab reference.
- Optionally, use the Dimension tab to add existing dimension tables to
the extract table and specify the key fields to join on. The extract table becomes a base table for
the selected dimension tables and can be used in downstream processes.
Note: The Dimension tab is not applicable if you are extracting data to the Unica Campaign Server.
-
Select the General tab to set the following options.
- Click OK to save and close the configuration.
Results
The process is now configured. You can test run the process to verify that it returns the results you expect.