Creating and monitoring an infrastructure component
Infrastructure Components help you communicate with the operations defined in the system. You can create an infrastructure component either from the toolbar or the menu. You can also associate a log file with an infrastructure component for monitoring purposes.
Contents
Creating an infrastructure component
An infrastructure component can be created in one of two ways:
- From the toolbar: Click the wanted location of the new infrastructure component (that is, an existing component or the drawing palette) and select the wanted component type from the menus across the top of the drawing palette.
- From the menu: Right-click the wanted location of the new infrastructure component (that is, an existing component or the drawing palette) and select the wanted component type from the New menu.
In the Create... dialog, provide a name for the new component and click OK.

- Only one physical type can be bound to the logical component. For example, a web server is the only physical component that can be bound to a logical HTTP connection.
- No physical item of this type already exists.
Because the created physical resource is not configured, you must edit it, providing information such as hostname, security credentials, or other details.
Adding a log file to monitor an infrastructure component
Log files that are associated with infrastructure components (that is, logical components that can be bound to physical resources) can be configured for monitoring when the component is used in a test.
To add or modify a log file configuration for any of the supported components, double-click the component in the Logical View and select the Monitoring tab.
To add a log file configuration to the selected component, click Add and select Log File from the menu. If you want to copy an existing log file configuration, select its entry and click Copy. To remove an existing log file configuration, select its entry and click Remove.
Log file location and options
Under the Location tab you can configure the path to the log file, the log file name, and options for controlling whether to use a wildcard match for the log file (for example, *.log) and how to treat multiple files that match a specified wildcard.

In the Path field, enter the full path to the location where log files attached to the selected component are stored. By default, the path is c:\domain\deployment\.
In the File field, enter the name of the log file to be monitored. Wildcard entries can be used for the file name (for example, *.log, *.txt). If you are using a wildcard, ensure that the appropriate matching options are selected under Options.
Under Options, enable one or both of the available matching options, as follows:
- If a wildcard is specified in the File field, ensure that the Wildcard match File option is enabled.
- If wildcard matching is enabled and more than one-log file can be matched, enable the With multiple matches choose last modified option to use only the most recently modified file. If multiple files are matched and this option is not enabled, errors can occur.
Log file format options
Under the Format tab you can configure the format of individual log file entries so that HCL OneTest™ API can distinguish one entry from the next, timestamp options to help recognize the timestamp format that is used in the selected log file, and technical correlation matching options to identify different transactions that are logged.

Entry format
In the Entity field, enter a regex that defines a single event (entity) in the log. The specified expression must match the start of one entity and any text that comes before the start of the next.

In the Treat gaps between entries as panel, select one of the four options to define how HCL OneTest™ API treats any gaps that it finds in the log, as follows:
- Attached to last Treats the gap as being part of the previous log entity
- Attached to next Treats the gap as being part of the next log entity
- An error Produces and error if any gaps are found
- Ignore Ignores any gaps that are found in the log
If you click the Edit button to the right of the Entity field, the regex editor is displayed, showing a sample of the log file that is defined under the Format tab.
You can edit the expression in the Regex field and view a live preview of the entities that it defines. Matching entities are colored (alternatively) blue and green to illustrate how the expression behaves at run time.
You can build expressions by selecting a portion of the preview text. Once you release the mouse button, the expressions are displayed in a menu. To use one of the suggestions, simply click the entry in the list. To close the menu without using one of the suggested expressions, select the Close menu option at the top of the list.
To save any changes you made to the expression, click OK. To return to the log file configuration without applying any changes, click Cancel.
Timestamp
The Timestamp settings are optional, but they can be used to help HCL OneTest™ API determine how to present timestamps within the log file, and calculate when a specific entry was written since logs are generated in an asynchronous manner.

The options under Timestamp can be used as follows:
- Regex The regular expression that is used to locate the timestamp (For more information, see the previous topic about Entry Format)
- Parse Format A date format/pattern that can be used to create a SimpleDateFormat object
- Time Offset A time value that is added to the time stamp value once it is parsed
In the Treat entries without timestamps as panel, select one of the three options to define how HCL OneTest™ API treats entities that are missing timestamps, as follows
- Same as last Apply the same timestamp as the previous entity
- Same as next Apply the same timestamp as the next entity
- An error Produce an error and fail the test if no timestamp is resolved
Technical correlation
The options under Technical Correlation can be used to identify separate transactions that were logged concurrently.
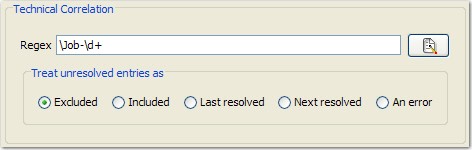
In the Regex field, enter a regular expression that identifies a unique transaction ID within log entities (For more information, see the previous topic, Entry Format, about using the expression editor).
In the Treat unresolved entries as panel, select one of the five options to define how HCL OneTest™ API treats entities that do not contain the transaction ID, as follows
- Excluded Exclude entries from all transactions
- Included Include entries in all transactions
- Last resolved Treat entries in the same transaction as the previous log entry
- Next resolved Treat entries in the same transaction as the next log entry
- An error Produce an error and fail the test if no transaction ID is resolved
Log file actions
Under the Actions tab you can define specific test actions that are to be taken when a log entity matches the specified expression.
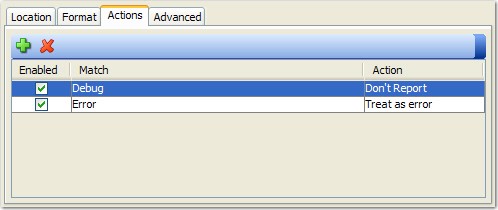
To add an action
to the list, click the  icon.
icon.
For each action in the list, check the box under Enabledto apply the action to tests at run time. To leave the action in the list but not use it at run time, leave the Enabled check box empty.
Double-click the field under Match to preview the log file and create an expression to match within entities. You can enter the expression manually, or use the expression editor as described (under Log file format options).
From the Action field, select one of the following three actions to take when the specified expression is matched in a log entity:
- Don't Report - ignore the entry and do not generate any console output
- Treat as error Flags the entry as an error in the console and fails the test
- Treat as warning Flags the entry as a warning in the console but does not fail the test
To remove an action from
the list, click the  icon.
icon.
Advanced log file options
Use the options under the Advanced tab to configure log file encoding and the method to use for determining if/when the log file rolls over.
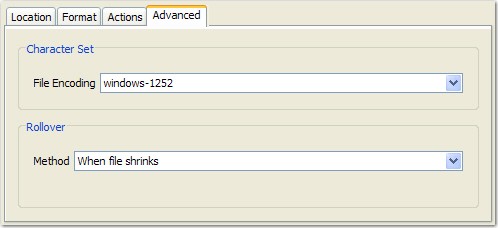
Under Character Set, from the File Encoding menu, select the one of the available encoding methods to use when you are processing the log file.
The Rollover method helps to determine when the log file is rolled over and a new file is started. This option is not currently used, however, and the default value (When file shrinks) must be left unchanged.