Editing GraphQL messages
After you have applied the GraphQL schema to messages that you used in your tests, you might want to modify some or all of the configurations for GraphQL messages. You can then edit the GraphQL messages to make changes to the content, change the message type, or reapply the schema among other tasks.
Before you begin
- Applied the GraphQL schema to messages. See Applying the GraphQL schema to a message.
- Opened the message from the Test Factory view.
Procedure
-
Right-click text (String) in the Message field, and then click Schema.
The Schema Selector dialog box is displayed.
The schema that was applied to the message is displayed. You can choose to change any of the following configurations that were set earlier either at the time you applied the GraphQL schema or during a subsequent edit.
-
Expand the Formatter Properties section and perform the action listed in the following table:
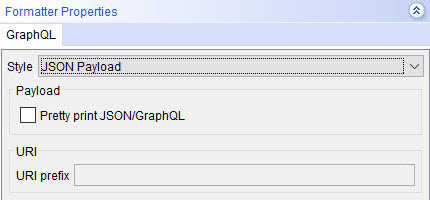
Option Description Action Style
The options available are as follows:- JSON Payload
- GraphQL Payload
- Query Parameters
The preference setting that are applied to messages that use the GraphQL schema.
The default option is JSON Payload.
The default option can be changed from the project preferences settings in .
Select the style that you want to change from the one that is selected. - Select JSON Payload if the message body is to be displayed and sent as a JSON encoded string.
- Select GraphQL Payload if the message body is to be displayed and sent in the GraphQL format.
- Select Query Parameters if the content of the message is to be sent as URL encoded query parameters and the message body is empty.
Payload Pretty print JSON/GraphQL
When selected, the JSON data or GraphQL data is formatted with proper indentation and line feeds that enhances the display to be pretty. Select from the following options:- Select this option, if it is not selected.
- Clear the selection, if it is selected.
URI This option is enabled only when you select Query Parameters as the preference setting in the Style field. The URI prefix replaces the Resource Path in the base URL in the message headers.
Select from the following options:- Enter the URI prefix in the URI prefix field, if no prefix exists.
- Clear the URI prefix, if a URI prefix exists.
-
Expand the Content Options section and select your action from the following options:
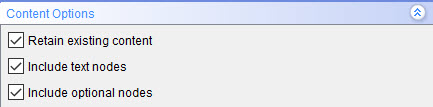
Option
Description
Action
Retain existing content
When this option is selected, you can apply a schema or expand a field without losing the original data in the messages.
When this option is not selected, existing data is cleared before the new schema is applied.
Select from the following options:- Retain the default selection.
- Clear the selection.
- Select this option, if it is not selected.
Include Text nodes
When this option is selected, you can generate Text nodes with the message.
When this option is not selected, the text nodes do not appear.
Select from the following options:- Retain the default selection.
- Clear the selection.
- Select this option, if it is not selected.
Include optional nodes
When this option is selected, you can select and add the optional fields that the schema includes in the message.
When this option is not selected, you cannot add any optional fields.
Select from the following options:- Retain the default selection.
- Clear the selection.
- Select this option, if it is not selected.
- Click OK to save the updated message settings.