Passkey authentication
Learn how to enable passkey authentication on a Domino server or internet site for improved security.
Before you begin
- Create a new Internet Site if desired
-
If you want to enable passkey authentication for a new DNS host name, such as for testing purposes, create a new Internet Site for that new host name. For details, see Understanding Internet site documents on Domino servers.
- Enable session authentication
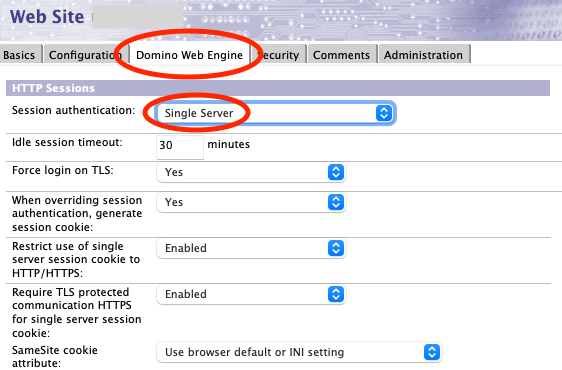
- Enable session authentication in the server document or Internet Site
document for the websites in question.On the Domino Web Engine tab, set the "Session authentication" drop-down to either Single Server (DomAuthSessId) or Multiple Servers (SSO) (LTPAToken). Note that "SAML" is not actually a form of session authentication despite being in the session authentication drop-down menu.
For more information on multi-server session authentication, see Multi-server session-based authentication (single sign-on).
About this task
- Passkey authentication is only supported on Domino servers on 64-bit Linux or 64-bit Windows.
- The passkey functionality in web browsers is rapidly evolving and improving, so for an optimal user experience we recommend using current web browsers.
- MacOS 10 and below do not support passkeys. MacOS 11 (and Safari 16.1) are minimum versions.
Procedure
- Create the passkey database.
Create passkey.nsf from the passkey.ntf advanced template.
By default, this database must be in the root of the data directory and must have an all-lowercase file name of "passkey.nsf". The name and location of passkey.nsf can be changed using the PASSKEY_DATABASE notes.ini, which should be set to a path relative to the Domino server's data directory. For example, PASSKEY_DATABASE=test\mypasskeys.nsf would cause Domino to open mypasskeys.nsf in the test subdirectory under the data directory.
We recommend limiting access to this database, especially write access, and encrypting this database unless the cluster symmetry feature is being used.
If passkey authentication is desired for multiple Domino 14 servers, then passkey.nsf will need to be regularly replicated between those servers so a passkey created against one Domino server can be used for another server.
- Optional: Customize the Domino
server's Relying Party name.
During creation, each passkey is scoped to a single Relying Party (RP) and can only be utilized by web origins belonging to that RP. RPs cannot detect properties for or even the existence of passkeys scoped to different RPs. This scoping is performed via a Relying Party Identifier (RP ID) based on host's domain name -- essentially the HTTP origin without the scheme and port. For example, https://www.domino.example.com:8443 would have an effective domain of www.domino.example.com. WebAuthn also allows RPs to use a registrable subdomain of their effective domain as their RP ID. For example, https://www.domino.example.com:8443 could have an RP ID of www.domino.example.com, domino.example.com, or example.com, but not .com or login.example.com.
By default, Domino will use the website's effective domain as the RP ID and will use the "Descriptive name for this site" field from the Basics tab of the Internet Site doc as the "friendly" name for the RP. The friendly name is shown by web browsers under some circumstances, and is used in passkey.nsf when sorting passkeys by Site. If Internet Site documents are not being used then the friendly name will be blank unless the PASSKEY_SERVER_FRIENDLY_NAME notes.ini is used as described below.
You can use the following notes.ini variables to configure Domino to use a registrable subdomain for the RP ID, so passkeys registered on one Domino server can be used on another related server:Note: PASSKEY_SKIP_LEVEL=N and PASSKEY_DOMAIN_LEVELS=N are mutually exclusive.- PASSKEY_SKIP_LEVEL=N
Use to skip the first N parts of the effective domain when constructing the RP ID. For example, PASSKEY_SKIP_LEVEL=1 could be used to allow server01.domino.example.com, server02.domino.example.com, and server03.domino.example.com to all use an RP ID of domino.example.com and share passkeys. If these sites were hosted on different Domino servers, then passkey.nsf would need to be replicated between them.
- PASSKEY_DOMAIN_LEVELS=N
Can be used to only use the last N parts of the effective domain when constructing the RP ID.
For example, PASSKEY_DOMAIN_LEVELS=3 could be used to allow server01.domino.example.com, www.mytest.domino.example.com, and domino.example.com to all use an RP ID of domino.example.com and share passkeys. If these sites were hosted on different Domino servers, then passkey.nsf would need to be replicated between them.
- PASSKEY_SERVER_FRIENDLY_NAME=my_friendly_site_name
Use to change the friendly name for the RP. This is useful when an administrator wants multiple Internet Site documents to share passkeys and wishes them all to be perceived as a single site or service.
- PASSKEY_SKIP_LEVEL=N
- Enable passkey authentication.
Enable passkey authentication in the server doc or Internet Site document.
In the "TLS Authentication" category on the Security tab, set Passkey (WebAuthn) to Yes.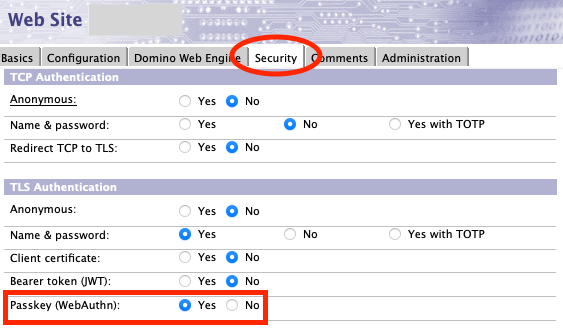
- Optional: Configure a passkey login
form using domcfg.nsf.
Domino's default session login form includes a passkey autofill through interacting with the username or password fields and passkey modal login via the Log in with a passkey button.
If you are using custom login forms stored in or based on domcfg.nsf (or the default login forms from that database), the domcfg5.ntf template includes the form $$LoginUserFormPasskey, which contains passkey autofill and passkey modal functionality. This form can be used as-is, or the logic from this form can be incorporated into a custom login form.
To use the passkey login form, open domcfg.nsf, click on the Add Mapping button.
Then create a new "Sign In" Form Mapping with the Target Form set to "$$LoginUserFormPasskey".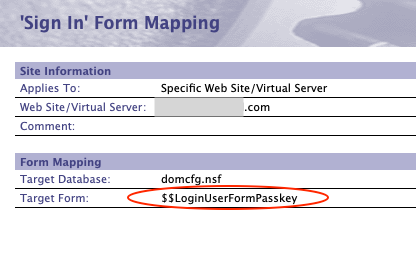
For information on customizing the HTML log-in form, see Customizing the HTML log-in form.
What to do next
Optionally, you can configure other passkey authentication settings, for example last logged in time updates, attestation, passkey registration limit, and user verification. For more information, see Optional passkey configurations.