Skins
Skins represent the border rendering around components, such as row containers, column containers, or portlets. The skin is loaded in the portal page by the <portal-core:pageRender/> tag. Skins are installed independently from themes. However, a skin can be associated with a theme.
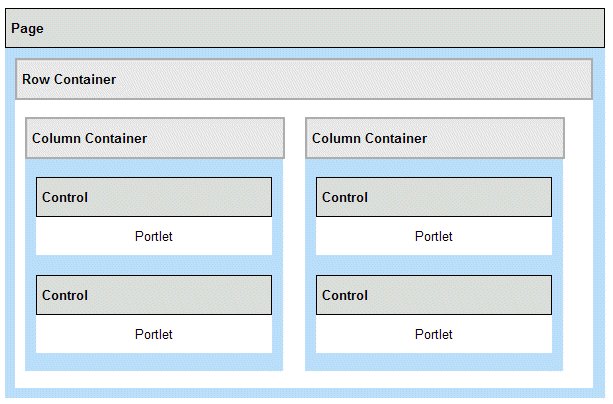
Skins define more than the look and feel of portlets; they define the look and feel of components. These components include the containers and controls. This hierarchical structure is depicted in the following diagram.
The components of the skin are called in the following order.
- The <portal-core:pageRender/> tag in the Home screen, Home.jsp,
displays the components for the selected node. The components are
implemented as row containers, column containers, and controls depending
upon the portal layout that is defined in the topic Portal page customization.
Controls are displayed using
Control.jsp. The figure in the Underlying layout of the home screen topic depicts one row container that has two column containers, each containing two portlets. - The row and column containers display their nested components using either Java code or the <portal-skin:layoutNodeLoop/> and <portal-skin:layoutNodeRender/> elements.
- Each portlet is rendered by the <portal-skin:portletRender/>
tag within the
Control.jsp.file. The control also builds the border and title bar around the portlet output.Note: Some of the icons in the portlet title bar have an impact on performance.
Provided skins
The IBM, Noskin, ThinSkin, and IFRAME skins are provided by HCL DX Portal for rendering portlets.
Page
Builder - Standard and Page Builder - Thin are two new skins that
can be assigned to the Tab menu - Page BuilderPage Builder theme. These skins are located in wp_profile_root/installedApps/node_name/Enhanced_Theme.ear/wp.theme.enhancedtheme.war/skins/html
- The Page Builder - Standard and Page Builder - Thin skins must be used with the Tab menu - Page BuilderPage Builder theme only. It is not recommended that these skins be assigned to themes other than the Tab menu - Page BuilderPage Builder theme.
- The IFRAME skin cannot be set as the Portal default skin. It is also not recommended that you assign the IFRAME skin to the Portal theme. The IFRAME skin is only to be assigned to portlets that have been specifically designed for the skin.
- If the Portal theme directory is either deleted or renamed, the
portal resource loader uses the
themes/html/Default.jsp. In this case, you should also use the fallback skin. To do this, rename theskinsdirectory. For example, theskins\html\IBMdirectory should be renamedskins\html\IBM1. If you have a broken theme, you can rename the theme and skin directories which are causing the problem to get to a working minimal theme.
More about the IFRAME skin
The IFRAME (inline frame) skin that is provided has a more practical purpose than the other skins. It renders portlet content in an HTML IFRAME on the page. IFRAMES are treated as separate browser windows and are used for the inclusion of external objects including other HTML documents.
The IFRAME skin is especially useful for portlets that are slow to render, allowing the rest of the portal page to render without waiting on the content from the portlet within the IFRAME. The width of this skin is set to 100% and height is set to 250 pixels.
To change this setting, use following steps:
- Locate the /IFrame subdirectory in the ../skins/html directory.
- Edit the file Control.jsp.
- Locate the markup for the IFRAME:
<iframe src='<%wpsURL.write(out);%>' SCROLLING="auto" FRAMEBORDER="0" Width="100%" height="250"> - Change the width and height attributes of this tag.
- Save and close the file.
Automatic portlet maximization
- Portal level
To configure all portlets to automatically maximize when the mode is changed, set the portlet.automaximize configuration service parameter to true.
- Skin level
This behavior can be implemented in portlet skins, using the <portal-navigation:urlGeneration/> tag, so that the administrator can control which portlets are automatically maximized. For example, you could create a skin called Highlight and a skin called Highlight_Max, with the only difference between the two is that Highlight_Max is used to automatically change the portlet state when the portlet enters another mode other than View.
- Portlet level
To configure specific portlets to automatically maximize, the portlet developer can com.ibm.portal.automaximize initialization parameter to true.