HCL Commerce GraphQL extensions
The HCL Commerce GraphQL provider creates and hosts a GraphQL server endpoint that delegates requests to a set of REST services defined by a set of OpenAPI 3 requirements.
The following figure depicts the fundamental GraphQL system operation. 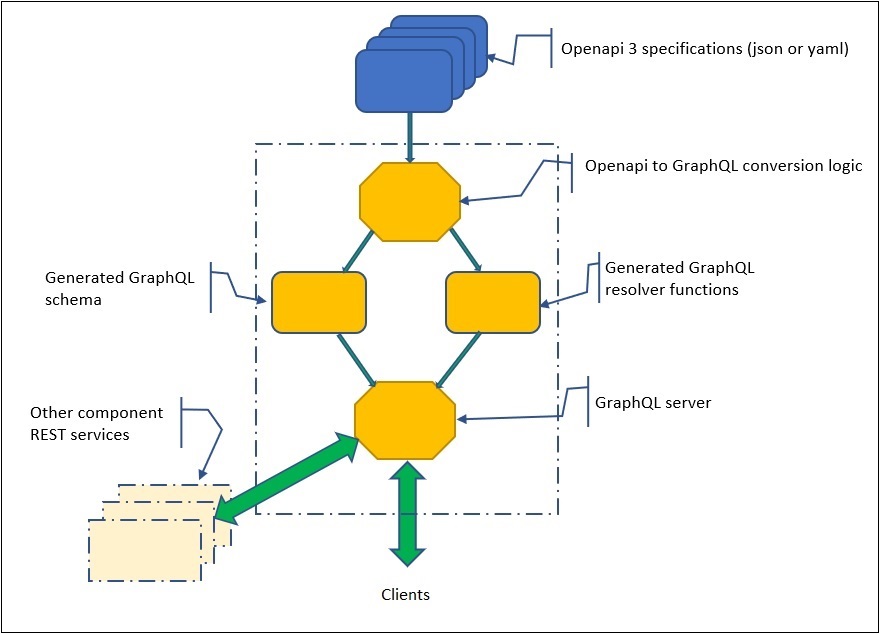
HCL Commerce provides OpenAPI 3.0 specification files for its REST services. The GraphQL provider consumes those REST specifications and generates a GraphQL schema that exposes the same function. The provider also generates a set of resolver functions that implement the GraphQL operations by delegating to the REST services provided by other parts of HCL Commerce.
These generated schemas and resolvers provide top-level query and mutator fields generated from the REST operation paths and methods. Each top-level field is declared with mandatory and optional parameters matching the parameters of the original REST operation. Nested fields are also generated from the REST response schema.
Links
The GraphQL schema generates additional fields that match to Link elements in the OpenAPI requirements. Links are static declarations in OpenAPI that describe how the request or response values from one API invocation can be utilised to give part or all of the parameters required by another API. The linkages in GraphQL are implemented as nested fields with parameters that can access relevant data from the second API based on the findings of the first.
A query for product data, for example, may provide merchandising associations for the product, as well as comprehensive pricing, inventory, and associated promotions. Each “drill down” possibility might be represented as a nested field in the product's GraphQL schema, with a generated resolver function that accesses the corresponding REST API for association, price, inventory, or promotion. Because a resolver in GraphQL only runs if its field is present in a selection set, defining these additional fields isn't necessary unless a query specifically requests them.
Fields created from OpenAPI links are unable to describe all ideal REST API connections. A link is specified at the top level of an API response, and the GraphQL schema generator just below the field that is mapped to the first REST API adds a field for the link. This is not always the case, and the link field should be placed further in the schema. This is especially true when the first API returns an array of results and the intended GraphQL mapping involves a field that occurs in each of the array's elements. The automated OpenAPI to GraphQL conversion mechanism cannot reach this outcome.
OperationRef extension
The OpenAPI 3 specification allows the target operation of a link to be identified by an operationRef a relative or absolute URI with a fragment identifier following the json-pointer (RFC 6901) syntax and resolving to an Operation Object definition in the same or another OpenAPI 3 document.
When a reference is to an operation defined in the same document as the link, its operationRef may consist of only the fragment portion, for example #/paths/~1store~1{storeId}~1cart/post inside the cart.json OpenAPI document refers to the POST operation for adding an item to the cart.
If the reference is to an operation defined in another document, the json-pointer would normally require an absolute URI to locate the target document. As an extension, HCL Commerce GraphQL allows the non-fragment portion of the URI to be replaced by either the OpenAPI title of the target document or its filename (that is, the last component of its file path). A reference to the same cart operation from another OpenAPI document could then take the form cart.json#/paths/~1store~1{storeId}~1cart/post.
Extensibility
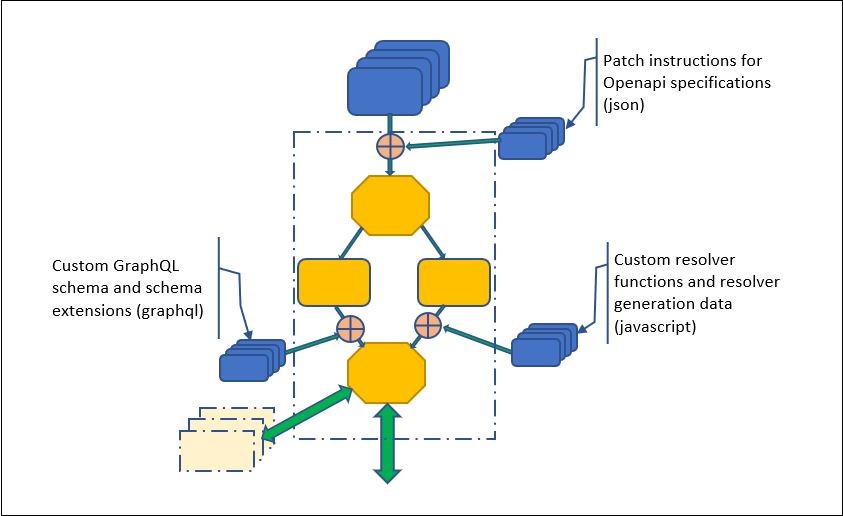
Modification and augmentation of the resulting schema and resolvers is also possible with the Commerce GraphQL service to handle requirements that the conversion logic does not cover. There are three points in the diagram below where extra inputs are accepted:
- OpenAPI patch instructions
- Without altering the original specification documents, selected modifications to the OpenAPI specifications can be deployed as custom extensions or environment-dependent dynamic updates.
- Custom GraphQL schema
- New types and type extensions can be merged with the generated GraphQL schema.
- Custom resolvers
- Individually coded resolver functions can be incorporated to either replace or provide data for fields included in a custom schema extension. A resolver may also be constructed in the same way as an OpenAPI Link declaration but connected to any field in the expanded GraphQL schema.
OpenAPI patch instructions
You can supply one or more files or URLs containing sets of patch instructions that conform to the Json-Patch standard (Internet RFC 6902).
For example:
{ {
 "Search": [
    {
      "{"op": "replace",
      "path": "/servers/0/variables/port/default",
      "value": "3738""},
    }
  ]
}

  {"op": "replace", "path": "/servers/0/variables/hostname/default", "value": "solrhost"}
 ],
 "Query": [
  {"op": "replace", "path": "/servers/0/variables/port/default", "value": "3738"},
  {"op": "replace", "path": "/servers/0/variables/hostname/default", "value": "queryhost"}
 ],
 "*": [
  {"op": "replace", "path": "/servers/0/variables/port/default", "value": "9443"},
  {"op": "replace", "path": "/servers/0/variables/hostname/default", "value": "tshost"}
 ]
}
The patch file replaces the default port number declared for the first server in the OpenAPI specification document that has the title Search.
The patch instructions can add, replace, or remove properties and array elements from the OpenAPI documents. The values that are added or replaced may be scalars as in the example, or complex json objects or arrays.
Custom GraphQL schema
The GraphQL schema language includes the declaration of response and input types and the extension of existing response and input types. You can supply files containing type declarations and extensions, and those contents will be combined with the schema generated from the OpenAPI inputs.
extend type Query {
  productInventory(storeId: String!,
                   partNumber: String,
                   fulfillmentCenterNames: [String]): [InventType]
}

type InventType {
  fulfillmentCenterName: String
  fulfillmentCenterId: ID
  quantityOnHand: Int
}
Because resolver function generation has already completed before these fields were added, they will be assigned trivial resolvers as defined by the GraphQL.js package. If this is insufficient, custom resolvers must also be provided.
GraphQL schema
The combined schema includes files for all OpenAPI schemas, including GraphQL. To view the schemas, navigate to http://localhost:3100/graphql. Select the DOC tab. The documentation for all the schemas is presented. If you want to view only the GraphQL documentation, it can be found in the file /SETUP/Custom.
GET /store/{storeId}/productview/bySearchTerm/{searchTerm}findProductsBySearchTerm : Equivalent to Query Service GET /store/{storeId}/productview/bySearchTerm/{searchTerm}The response will be the findProductsBySearchTerm GraphQL query.
Custom resolvers
You can provide custom resolvers in situations where a generated resolver function is inadequate, or a custom field was added using a GraphQL schema extension so no resolver function was generated. Custom resolvers are supplied as CommonJS modules that export either a single object, or a function that returns an object.
- obj
- The previous object returned by the parent resolver.
- args
- The field arguments provided in the GraphQL query.
- context
- A value containing data from the request, passed to each resolver.
- info
- Data specific to the current field including the field name and type.
- The Graphql-tools project https://www.graphql-tools.com/docs/resolvers provides detail about the obj, args, and info parameters and the returned value.
- The express-graphql project https://github.com/graphql/express-graphql provides detail about the context argument. HCL Commerce GraphQL uses the default context, which in express-graphql is the http request object (type IncomingMessage from module http).
The second-level properties may also be objects whose contents are the same as an OpenAPI Link Object. In that case the resolver generation code will be used to create a resolver function that calls a REST operation as though a link definition were being processed. The resolver will however be attached to the type and field determined by the top-level and second-level property names. This capability is useful if the expressiveness of the link definition is sufficient but the usual link processing would create a field in an undesirable location in the schema.
module.exports = {
  SampleType: {
    someThingDetail: function(src,args,ctxt,info) {
        return 'fakeThingDetail';
    }
  }

  ProductViewCatalogEntryViewProductSearch: {
    productPriceDetails:   {
      operationRef:
        "price.json#/paths/~1store~1{storeId}~1price/get",
      parameters: {
        storeId: "$request.path.storeId",
        q: "byPartNumbers",
        partNumber: "$response.body#/partNumber",
        profileName: "IBM_Store_EntitledPrice_RangePrice_All"
      }
    }
  }
}
- generate
OASLinkResolver(linkSpec) - Returns a resolver function generated from the OAS link spec provided.
module.exports = function(utils) {
  const link_resolver = utils.generateOASLinkResolver({
    operationRef: "price.json#/paths/~1store~1{storeId}~1price/get",
      parameters: {
        storeId: "$request.path.storeId",
        q: "byPartNumbers",
        partNumber: "$response.body#/partNumber",
        profileName: "IBM_Store_EntitledPrice_RangePrice_All"
      }
  });

  return {
    ProductViewCatalogEntryViewProductDetails: { priceDetails: link_resolver },
    ProductViewCatalogEntryViewProductSearch: { priceDetails: link_resolver },
    ProductViewCatalogEntryViewValue: { priceDetails: link_resolver },
    ProductViewSKUDetails: { priceDetails: link_resolver },
    ProductViewCatalogEntryViewDetails: { priceDetails: link_resolver }
  };
}
More about complex resolvers
The previous example of a resolver extension module was more complex but still only included one standalone Javascript file. When the code required for a custom resolver is more complex than a single Javascript file, either because it consists of more than one Javascript file or it require() loads other dependent modules, it can be implemented as a full-fledged npm module.
As an example, consider the same price details extension but where custom code calculates the result using an imported package.
  const Chance = require('chance');

  module.exports = function(utils) {
    const price_resolver = async function(obj,args,context,info) {
        var chance = new Chance();

        return {
                resourceId: chance.string(),
                resourceName: chance.string(),
                entitledPrice: [{
                    contractId: chance.string(),
                    productId: chance.string(),
                    partNumber: obj.partNumber,
                    unitPrice: [
                        {price: { currency: "USD",
                            value: chance.floating({fixed:3}) },
                         quantity: { uom: "C62",
                            value: chance.floating({fixed:3}) }}
                    ]
                }]
        };
    }

    return {
        ProductViewCatalogEntryViewProductDetails: { priceDetails: price_resolver },
        ProductViewCatalogEntryViewProductSearch: { priceDetails: price_resolver },
        ProductViewCatalogEntryViewValue: { priceDetails: price_resolver },
        ProductViewSKUDetails: { priceDetails: price_resolver },
        ProductViewCatalogEntryViewDetails: { priceDetails: price_resolver }
    };
}
Packaging custom extensions
In the HCL Commerce GraphQL server container, all custom extension artifacts should be located in sub-directories under the path /SETUP/Custom.- /SETUP/Custom/oas should contain any OpenAPI 3 specifications that should be added to the collection provided by HCL Commerce. These files may be in yaml or json format.
- /SETUP/Custom/oasext should contain any patch instruction files as described above for adjusting the HCL Commerce provided OpenAPI specs.
- /SETUP/Custom/gqlext should contain custom GraphQL schema extension files.
- /SETUP/Custom/resolvext should contain the custom resolver CommonJS modules. The GraphQL server will attempt to require() each file found there.
- /SETUP/Custom/opts should contain any custom configuration files. For more information, see Changing GraphQL server configuration
- Create a new JSON/YAML file. (For example: Custom_Subscription.json) using OpenAPI Spec 3.0.
- It must be deployed to the /SETUP/Custom/oas/
directory.
(For example -v D:/test/Custom/oas:/SETUP/Custom/oas/).
- The updated custom API has to be verified. When the server starts, this new
json file entry will appear in the logs.
(For example: OpenAPI: [ '/SETUP/Custom/oas/Custom_Subscription.json']).
GraphQL will also have a new custom API as seen below:customSubscriptionByBuyerIdAndSubscriptionType( buyerId: String! profileName: ProfileName13 q: Q10! responseFormat: ResponseFormat storeId: String! subscriptionId: String! subscriptionTypeCode: String! ): SubscriptionIBMStoreSummary
GET
/store/{storeId}/customSubscription a query will be created as
follows:{
customSubscriptionByBuyerIdAndSubscriptionType(storeId:"1",q:BYSUBSCRIPTIONIDS,buyerId:"",subscriptionTypeCode:"1",subscriptionId:"1501"){
resultList{
state
subscriptionIdentifier{
subscriptionId
}
subscriptionInfo{
fulfillmentSchedule{
endInfo{
endDate
}
}
}
}
}
}
Packaging and Deployment
In version 9.1.9, the application will attempt to load all files it finds in the path /SETUP/Custom/resolvext using the require() method, including package.json files and anything it finds in a node_modules subdirectory. For this reason it is not possible to create CommonJS modules inside resolvext but it is possible to define a single complex custom resolver module in the /SETUP/Custom directory and then implement one or more module main files in /SETUP/Custom/resolvext.
% cd SETUP/Custom
% npm init
% npm install chance
The module defining Javascript file must be copied into SETUP/Custom/resolvext, and this Javascript file will be automatically be require() loaded by the main application, and it will have access to all the dependent modules installed in the containing. Although this example does not require other Javascript source files, if other files are required they should be located somewhere other than resolvext (for example, under SETUP/Custom/util), otherwise the main application will attempt to load them directly.
Developing
docker run –rm -it port maps envVars -v projectRoot/Custom:/SETUP/Custom graphql-app:latestHere projectRoot is the path on the host to
the Custom directory. port maps is a
sequence of -p hostPort:containerPort parameters. The
container ports of interest are 3100 for the GraphQL HTTP endpoint
and 3443 for the HTTPS endpoint. During development it may also be
useful to map the Node.js runtime debugger port, typically
9229. envVars is a
sequence of environment variable parameters -e “VAR=value”.
| LICENSE=accept | Mandatory |
| TX_HOST=<host> |
Domain name of the ts-app host. Defaults
to |
| TX_PORT=<port> | Port number of the ts-app REST services.
Defaults to 5443. |
| ELASTICSEARCH_ENABLED=true | Required if Elastic search is used. |
| QUERY_HOST=<host> | Domain name of query host. Defaults to
query. Only used if
ELASTICSEARCH_ENABLED=1. |
| QUERY_PORT=<port> | Query service port number. Defaults to
30901. |
| SEARCH_HOST=<host> | Domain name of Solr search host. Defaults
to search. |
| SEARCH_PORT=<port> | Search Solr service port number. Defaults
to 3738. |
| NODE_TLS_REJECT_UNAUTHORIZED=0 | Disable certificate verification of secure servers GraphQL connects to. Useful during development to trust self-signed certificates. Note: Even with this setting, the Node.js runtime version 14 still requires that certificates used for signing must either not have a key usage field, or the key usage field must have the Cert Signing bit enabled. This requirement must be met for CA certificates and for any self-signed certificates. |
| NODE_OPTIONS | Additional command line options for the node runtime. |
Debugging
The use of an interactive debugger to observe custom code behaviour and diagnose problems may be required for the development of more complex resolvers. With a little preparation, it is possible to access from outside a container the debugging services of a Node.js runtime executing inside the container, including examining variables and setting breakpoints.
Microsoft's Visual Studio Code is a popular tool for creating Node apps. Many programming languages, runtimes, frameworks, and execution platforms are available for Visual Studio Code through extensions offered by Microsoft or third-parties.
Prerequisites
To debug custom resolvers, you will need the Node Debug extension that is built in to Visual Studio Code, and the Remote Containers extension from Microsoft that can be downloaded and installed.
You should also have a project directory in your development host to contain the custom artifacts you are developing, organized like the contents of the /SETUP/Custom directory. For example, you may have a projectRoot/Custom directory with subdirectories opts, oas, oasext, gqlext, and resolvext.
- Start the container.
Supply these extra runtime options when starting the container.
- Bind mount projectRoot/Custom onto /SETUP/Custom
- Add a port mapping for the debugger of 9229 to 9229
- Add an environment variable NODE_TLS_REJECT_UNAUTHORIZED=0 if GraphQL should trust self-signed certificates when connecting to REST
- Add environment variable NODE_OPTIONS=--inspect=0.0.0.0:9229 or NODE_OPTIONS=--inspect-brk=0.0.0.0:9229 to enable debugging in the Node.js runtime. The second version causes the runtime to pause during startup until the debugger attaches and may be needed to debug problems during initialization.
If you use the
–inspectoption without specifying an IP address to bind to, Node.js will use localhost as the default and it will only be accessible from within the container.For example, if you start the container using the Docker command line from Windows or MacOS your command might be;docker run --rm -it -p 3100:3100 -p 9229:9229 -e "LICENSE=accept" -e "NODE_TLS_REJECT_UNAUTHORIZED=0" -e "NODE_OPTIONS=--inspect=0.0.0.0:9229" -e "TX_HOST=host.docker.internal" -e "QUERY_HOST=host.docker.internal" -e "ELASTICSEARCH_ENABLED=true" -v <projectRoot>/Custom:/SETUP/Custom graphql-app:latest - Attach to the container.
Right-click the running GraphQL container in the Visual Studio Code Remote Explorer panel and select Attach to Container. In the container, the Remote Containers extension will install and operate a remote access agent.
- Open the /SETUP directory.
Click the Open Folder button in the Explorer view. A dialog box will open initialized with the path /home/node. Replace this with /SETUP and click OK.
The view is populated with the contents of the /SETUP directory including the /SETUP/Custom files bind mounted from the host.
Open any source files in SETUP/Custom/resolvext that you will be working with.
The /SETUP/Custom files can also be viewed and edited using their path on the host, but breakpoints will only work if they are set from a view of the file using its path in the container.
- Attach the debugger.First create a launch configuration to debug a running Node application if you do not have a suitable one. It should resemble as follows:
  "launch": {
    "configurations": [
      {
        "name": "Node Attach",
        "port": 9229,
        "request": "attach",
        "skipFiles": [
            "<node_internals>/**"
        ],
        "type": "pwa-node"
      }
    ]
  }
Then in the Run and Debug view select the Node Attach configuration and start debugging. The Call Stack window will populate. You can now set exception breakpoints, or source code breakpoints in the open file views.
Troubleshooting
GET /store/{storeId}/productview/bySearchTerm/{searchTerm}- For Solr:
productViewFindProductsBySearchTerm : Equivalent to Search GET /store/{storeId}/productview/bySearchTerm/{searchTerm} - For Elastic:
findProductsBySearchTerm : Equivalent to Query Service GET /store/{storeId}/productview/bySearchTerm/{searchTerm}
SRVE0255E: A WebGroup/Virtual Host to handle /search/resources/store/11/productview/byId/12345 has not been defined.
With Elasticsearch for GraphQL, you can now only perform Elasticsearch GraphQL queries. Attempting to run a solar GraphQL query will result in an error note Invalid.API.please.use.ES.Query.