Android smart phone native application
Native application starter stores are accessed as an app
directly installed on smart
phones.
The Android smart phone native application delivers consistent functionality and usability elements that are directly based on the Android programming and styling guidelines. The application and storefront elements are all coded using the Android Software Development Kit (SDK).
Topic overview
This topic contains several sections of interest related to the Android smart phone native application.
Environment setup
The following tasks must be performed to setup your application development environment with WebSphere Commerce:
Hardcoded values
- Madisons-AndroidNativeMobile/src/com.ibm.commerce.android.nativeapp.mobile.activity/Splash.java
<_config:DevelopmentComponentConfiguration
xmlns:xsi="http://www.w3.org/2001/XMLSchema-instance"
xsi:schemaLocation="http://www.ibm.com/xmlns/prod/commerce/foundation/config ../xsd/wc-component.xsd "
xmlns:_config="http://www.ibm.com/xmlns/prod/commerce/foundation/config">

<_config:extendedconfiguration>
   <_config:configgrouping name="StoreIdDefaultCatalogIdMapForREST">
      <_config:property name="10101" value="10151" />
         </_config:configgrouping>
      </_config:extendedconfiguration>
</_config:DevelopmentComponentConfiguration>
property attribute values are:namerepresents the store ID, for example, 10101.valuerepresents the sales catalog ID, for example, 10151.
Setting up the project
- Download and install Eclipse and the Android SDK. See Android Developers: Installing the SDK for more information.
- Import the application source code into Eclipse. See Android Developers: Managing Projects from Eclipse with ADT for more information.
- Set the Android SDK (Android runtime and API) to resolve errors and compile the code. Select the Android runtime and API levels you want to target. For example, Google APIs 2.2 API 8.
- Generate a Google Maps key and include this key in the connpref.xml file. For more information see Obtaining a Google Maps Android v1 API Key.
WebSphere Commerce prerequisites
- Ensure that WebSphere Commerce search is enabled and that all search indexes are created.
- Ensure that the following SAR files are published:
- Madisons-FEP.sar
- MadisonsEnhancements.sar
- MadisonsMobileEnhancements.sar
Installing APK files
- Export the source from Eclipse as an APK file. See Android Developers: Building and Running from the Command Line for more information.
- Ensure that the APK file is signed, so that it can be installed correctly. See Android Developers: Signing Your Applications for more information.
- Install the APK file on either an Android emulator or an actual device. See Android Developers: Building and Running from the Command Line for more information.
Third-party application dependencies
- Android devices must install the Barcode Scanner application by ZXing Team from Google Play for the barcode scanning page to function correctly.
- Android devices must install the Voice Search application by Google Inc. from Google Play for the voice search page to function correctly.
Optimizations
The following tasks can be performed to optimize the application:
Optimizing product image dimensions
The Android smart phone native application shares its product images with desktop starter stores and smart phone and tablet starter stores. If you are using a set of high-resolution product images across both desktop and mobile stores, the images displayed on the Android native application might exceed the device’s display area. In addition, the images might increase the size of the ImageView used for the image, and possibly affect the page layout.
In this case, the Android smart phone native application can be updated to resize the full product images to optimize the display of the product image within the layout. This can be done by updating the user interface layout XML files for the corresponding activity where the product image is displayed.
- Madisons-AndroidNativeMobile/src/com.ibm.commerce.android.nativeapp.mobile.activity.catalog/ProductDetails.java
android:scaleType="centerInside"to center the scaled image within the ImageView.android:adjustViewBounds="true"to adjust the ImageView boundaries to match the image dimensions.
android:maxWidthto set the maximum width for the ImageView.android:maxHeightto set the maximum height for the ImageView.
 Note: A maximum value of 160dp (density-independent pixels) for both the
image height and for the full-size product images, and a value of 70dp for the thumbnail images
width is recommended for the images included with the Aurora starter store sample data.
Note: A maximum value of 160dp (density-independent pixels) for both the
image height and for the full-size product images, and a value of 70dp for the thumbnail images
width is recommended for the images included with the Aurora starter store sample data.System architecture
Android operating system architecture
Android is a software stack for mobile devices that includes an operating system, middleware and key applications. The Android SDK provides the tools and APIs necessary to begin developing applications on the Android platform using the Java programming language.
As the Android operating system architecture might change from one iteration to the next, see Android Developers: What is Android? for the latest information on the Android operating system architecture and programming model.
WebSphere Commerce Android native application architecture

- The WebSphere Commerce Android native application is a collection of Activities and its interaction with the server and the rest of the activities. Each activity is the representation of user interface screen within the application.
- There are device-specific activities such as the Address Book integration where the application launches the Contacts application from the Android Applications layer. For the barcode scanner feature, it launches a barcode scanner application from the same layer.
- The application uses the underlying Android Application Framework to not only exploit device-specific features, but to also interact with various activities or applications. For example, the application uses the Location manager to fetch the device location, the Content Providers to store and fetch data from the file system, and to retrieve contacts information from the contacts application.
- The communication interface for the application is through the HTTPInvoker. The invoker
initiates the HTTP requests for the appropriate REST APIs through the Local AsynchTask, defined in
each activity. For a request to the server with a JSON object, the activity composes the JSON
request object using the JSONBuilder and the response for the request is parsed using the
JSONParser. See the AsyncTask class overview for more information.Important: The communication interface uses a SampleSSLSocketFactory that bypasses secure connections. This is designed for test and demonstration purposes only. Therefore, it is not recommended to be used as-is in production. See the SampleSSLSocketFactory section for more information.
Sample interaction model
- The LoginActivity is the Activity class that displays the user interface and handles the actions
from the user interface. The layout of the user interface is set in the
accountsignin.xml file and the login button is defined in the
XML:
<Button android:id="@+id/loginbutton" android:layout_height="wrap_content" android:layout_width="match_parent" android:background="@drawable/orange_button_bg" android:gravity="center|center_vertical" android:layout_gravity="center|center_vertical" android:padding="10dp" android:text="@string/signIn_button" style="@style/NormalWhiteText.14"/> - The onClick action in the LoginActivity class takes the tap action from the login button user
interface and invokes the LoginWebServiceTask. The LoginWebServiceTask is invoked using the Login
REST
URI:
String url = ClientComponentHelper.getRESTfulURL(getBaseContext(), R.string.LOGIN_URL, true,false); LoginWebServiceTask task = new LoginWebServiceTask(url); task.execute(); - The LoginWebServiceTask extends from HTTPRequestAsyncTask which in turn extends from the
android.os.AsyncTask. The LoginWebServiceTask builds the JSONObject using the JSONBuilder for Login
with the user ID and password captured from the user interface and invokes the HttpInvoker
class:
invoker.invokeSecurePostRestServiceWithoutTokens(url, json) - The preceding method sends the POST request to the appropriate URI with the JSON object using the HttpClient execute method.
- The HttpResponse that is received from the HttpClient POST request is parsed and the parsed object includes the JSON response and is available as part of the onPostExecute(Object result) method.
- The JSON response is parsed using the JSONParser. These tokens are saved to include them in
future requests such as GetPersonDetails. The following snippet represents a sample login
response:
{ "userId": "1003", "WCToken" : "xxxxxxxxxxxxxxxxxxxxxxxx", "WCTrustedToken" : "xxxxxxxxxxxxxxxxxxxxxxxxx", "personalizationId" : "123456_1" } - After fetching the person details of the user, the next activity to display (for example,
MyAccountActivity) is
invoked:
Intent intent = null;
TabActivityGroup parentActivity = (TabActivityGroup)getParent();
intent = new Intent(parentActivity, MyAccountActivity.class);

parentActivity.startChildActivity("MyAccountActivity", intent);
Functional features
- Featured
- Includes the e-Marketing Spots, product search, launching the barcode scanner, and the check-in option for location-based services.
- Products
- Includes the catalog browsing functionality, product search and sorting, and checkout flows.
- Stores
- Includes options to search for nearby store locations, either by manually searching or by locating nearby store locations using GPS.
The application includes a menu option which includes signing in, signing out, My Account, Scan, Contact Us, Privacy Policy, and More options. The More options section includes Barcode scan history, Application language, and development settings.
- Personal Information
- Change Password
- Currency and Language settings
- My Orders
- My Stores
Mobile application flows
See Mobile application flows for more information on the native and hybrid store pages.
Store locator
The store locator feature helps users locate store locations that they might be interested in. Unlike the Madisons starter store, the mobile application has the advantage of knowing the user's current location. This information can be used to find stores closest to the user. The user's current location is detected by the application using either the GPS feature of the phone or based on the network provider the user is connected to. If GPS is turned off, the end user is prompted to check if they want to enable it. If not, the network is used to approximate the user's current location.
- android.permission.ACCESS_COARSE_LOCATION
- android.permission.ACCESS_FINE_LOCATION
Alternatively, if the user does not want to find stores nearest to their location, they can enter the city name or the postal code in the text box provided to make a search.
Once a set of stores is found using either of the approaches, the user can pick a store to complete the shopping flow or view it on a map or add it to their personal favorite store list to be used at a later time.
Check-in
The Check-In feature allows the user to share their current location with the server. Based on their location, they can receive nearby points of interest.
Barcode scanner
<string name="SCAN_INTENT">com.google.zxing.client.android.SCAN</string>
<string name="SCAN_PACKAGE">com.google.zxing.client.android</string>
The scanned URLs are present for future reference as part of the Barcode Scan History. The user can see these pages again by tapping each history link from .
Language settings
- Account language
- This language setting is applicable only for registered users. Once a user has signed in, they can change and update the language in their profile. This information is applicable to the user's account independent of the channel they use. This option is found under .
- Application language
- This language setting is applicable for both guest and registered users. This option can be used when the user wants to browse the application in a language different from what is set as the preferred language in their account. Registered users can choose to keep the application language the same as their profile language. If they are different, the application language takes precedence over the language setting in the account profile. This option is found under .
Development settings
This feature is included for development, test and demonstration purposes so that the application can easily be pointed to different servers or stores. When the application is launched for the first time, the development settings dialog is launched, where the user can input the IP address or hostname of the server to connect to, and the store ID that the application points to. This feature can be removed when the application is made available for distribution.
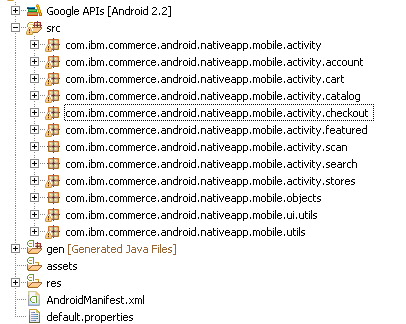
Application and directory structure
The application is built up of several files and directories:
Overview of the package structure
- src
- Contains Java source files.
- gen
- A Java source directory for files generated by the Android platform.
- res
- Contains all external resources used by the application.
Android Manifest file
- General
- Minimum SDK level.
- Application
- Register activities.
- Permissions
- Access that must be granted for the application to run.
- Instrumentation
- Profiling information used during development and testing.
Permissions
- android.permission.INTERNET
- Requests access to use the Internet from within the application.
- android.permission.CLEAR_APP_CACHE
- Requests permission to clear the application cache.
- android.permission.WRITE_EXTERNAL_STORAGE
- Requests permission to write to the external SD card.
- android.permission.CAMERA
- Requests permission to launch the camera application (for barcode scanner).
- android.permission.READ_CONTACTS
- Requests permission to read the contact information on the phone book.
- android.permission.ACCESS_COARSE_LOCATION
- Requests permission to use the location manager to detect location based on network.
- android.permission.ACCESS_FINE_LOCATION
- Requests permission to use location manager to detect location based on GPS.
- android.permission.ACCESS_MOCK_LOCATION
- Requests permission to use mock location providers for testing
- android.permission.ACCESS_LOCATION_EXTRA_COMMANDS
- Requests permission to access extra location provider commands.
<uses-library android:name="com.google.android.maps"/>
<string name="map_api_key"></string>
Source files
- Classes in the utils package
- These generic classes help the activity classes perform tasks such as communicate with the WebSphere Commerce Server through HTTP, conversion to and from JSON, and utility methods for validation.
- Classes in the ui.utils package
- These reusable classes help activity classes generate, render, validate and maintain parts of the user interface screen. For example, form validation, list generation, and maintaining activities with a tabbed window.
Application Resource files
- res/drawable
- Contains client-side images and pictures used by the application.
- res/layout
- Contains the user interface layout files used to render each screen of the application. The layout files are stored in XML format. See Android Developers: User Interface for more information.
- res/values
- Contains XML files that are mainly name-value pairs. These XML files declare arrays, styles, colors, and strings that are used by the application. Files such as strings.xml and arrays.xml are translated into other languages and enable the application to use language-specific strings at runtime.
- res/xml
- Contains XML files that are used to define preferences for the application.
- res/raw
- Contains name-value pairs that can hold files in their raw format. Content in this folder can be language-specific and contain translated files.
- res/anim
- Contains predefined animations used by the application.
Caching and temporary files
The native mobile application for WebSphere Commerce creates files at runtime to hold user preferences, session details and to improve performance:
Files created by the application
The native application creates files both in the default cache location on the phone memory and the external cache location on the SD card. These files remain private to the application and can be accessed only through the application.
Files on the SD card
- StoreFileList.txt
- Used to save the user's preference of stores. Every time the user adds a store to their favorites list, an entry is made into this file.
- ScannedUrls.txt
- Saves a history of the URLs obtained by scanning barcodes. This helps the user retrieve the scanned information at a later time through the barcode scan history option in the application.
Files in phone memory
- com.ibm.commerce.android.nativeapp.mobile.activity_preferences.xml
- The default preference file generated by Android. This default file is used to hold the user's preference of language, currency and other information needed for the session.
- login_details.xml
- Populated with the user's session cookies and user ID for a particular session. This file is cleared every time the application exits or the user signs out.
Caching of images
The native application caches images retrieved from the server to improve performance. There are 3 levels of caching employed:
- Hard cache
- As a collection of the bitmaps of the images.
- Soft cache
- Stores soft references to the bitmaps of the images.
- Default SD cache
- As images are retrieved from the server, they are written to the default cache directory on the SD card to avoid fetching from the server every time.
Using just a cache of soft references is not very useful as they are garbage collected very aggressively by the Android operating system. This in-memory cache gives the advantage of quicker access. The hard cache is cleared based on the time since last access, or if there is a need for space.
Using the SD card gives the advantage of a growable cache. The application automatically clears this cache when files are older than 30 days, or based on an access threshold which can be configured in the connpref.xml file.
SampleSSLSocketFactory
<string name="SSL_FACTORY">com.ibm.commerce.android.nativeapp.mobile.utils.SampleSSLSocketFactory</string>
<string name="KEY_STORE_PASSWORD"></string>
The custom trusted SSL_FACTORY class name can be replaced for SampleSSLSocketFactory with the key store password and the getSecureHttpClient in HTTPInvoker. The custom secure SSLFactory can validate and load the trusted certificate using the TrustManager.