Managing Bare Metal OS Deployment Servers
The Bare Metal Server Manager dashboard manages the installation, upgrade, and uninstallation of Bare Metal OS Deployment servers.
The list of all Bare Metal OS Deployment servers that are subscribed to the site is displayed in the dashboard. You can install the latest OS Deployment server directly from the network in a single step, or you can upload an older installer in the Upload section by clicking the dropdown button. If at least one installer is already present, the Upload section is always displayed.
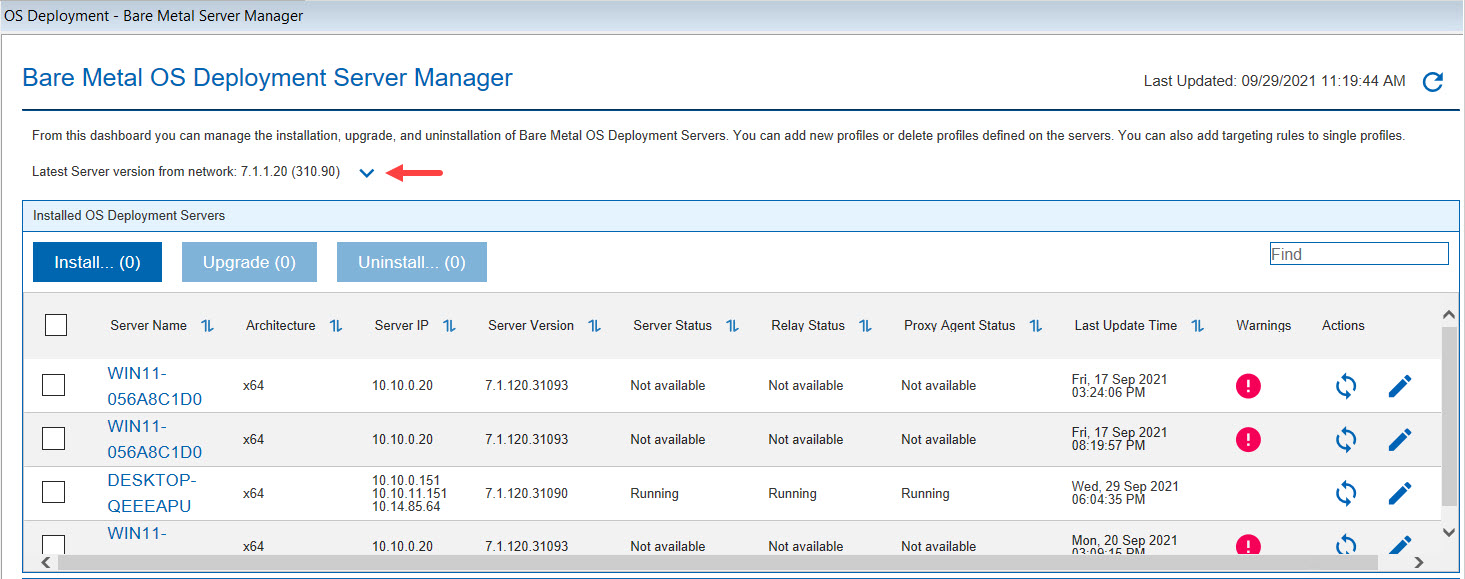
The latest version of the OS Deployment server installer available from the network is displayed at the top left corner of the page. Run the installation by clicking Install and select one or more available relays. Ensure that the relays you select are subscribed to the OS Deployment and Bare Metal Imaging site. Network installers are available for BigFix 9.2 or later.
If you want to install or upgrade your OS Deployment Servers from the network but you already have an installer of an earlier release that you uploaded from Fix Central, you must first delete the existing installer because uploaded installers have precedence over network installations.
If you are upgrading from a previous release, select one or more Bare Metal OS Deployment servers, and click Upgrade.
- If the relays you select already have the Image Provider component installed, you must remove it by using the "Uninstall Linux Image Provider Task" before you install the OS Deployment Server.
- Authentication must be disabled for the relay on the Bare Metal Server computer.
- If you are upgrading your Bare Metal Server from version 7.1.1.20.311.12 or lower to a version newer than 7.1.1.20.311.12, this upgrade includes an improvement on password security and you will be required to provide the login password to set on your Bare Metal Server. You can also reuse the current password.
Accept the license and specify where to install the OS Deployment Server. Before you install, you must enter the user name and password for the login on the OS Deployment Server.
The Bare Metal Server installation task downloads and installs Microsoft SQL Server Express 2014 SP1 or Microsoft SQL Server 2017 Express (depends on the OS version) on the selected relay, if a database is not already installed.
- DB2 Enterprise 9.1 FP4a, 9.5 FP3b, 9.7, and 10.1
- Microsoft SQL Server 2005 SP2 and 2008 R2
- Microsoft SQL Server 2012
- Microsoft SQL Server 2014
- Microsoft SQL Server 2017 Express Edition
- Microsoft SQL Server 2019 Express Edition
- Create a database with a name of your choice.
- Run this step only if you have one of the Microsoft SQL Server versions listed above. Add the necessary roles to the user named NT AUTHORITY\SYSTEM for the database you created in the previous step. For example, using Management studio: , then select the database to add the following roles:
- db_datawriter
- db_datareader
- db_ddladmin
- public
- Create a Data Source named AutoDeploy using 64-bit ODBC drivers for your database.
- Verify that the ODBC connection can be established correctly to the database you created in the first step.
- Proceed with the installation of the Bare Metal Server.
- The installation task ignores the user provided Data Location if data from a previous installation is present and the data directory is set to the existent one. If you want a different folder, get a clean environment by running Task 134.
- If you are installing a Bare Metal Server on a Windows 2008 R2 relay, ensure that it is at Service Pack 1 (SP1) level, or the installation will not complete successfully.
- After you install OS Deployment servers from the Bare Metal Server manager dashboard, you must create and manage profiles and bare metal deployments from the BigFix Console only, using the BigFix infrastructure. You cannot manage the server or any deployment objects on it from Tivoli Provisioning Manager for OS Deployment interfaces.
- If you are installing the Bare Metal Server from a BigFix console running on Windows 2012 R2, the version of Adobe embedded in this operating system may cause bare metal server synchronization problems. To avoid this issue, before you install the Bare Metal Server, ensure that you have installed all the latest Microsoft patch updates.
- Some functions of the dashboard might be limited if the Bare Metal servers are not at a minimum required version. When you change a resource on a Bare Metal server, such as importing a new MDT Bundle, importing or modifying drivers, an action is automatically generated to update the servers.
-
The BigFix Web Interface Extension service is set as disabled among Windows services. Do not change this setting, as this service must not be running. However, its process is automatically started when needed.
If any of the resources are out of date, a warning is displayed.
Click ![]() to
synchronize the server resources.
to
synchronize the server resources.
Two types of synchronization are possible. The Delta sync is available only if some Bare Metal Server resources (like profiles, deployment engines, drivers, etc.) are out of sync. With Delta sync, you can synchronize only the out of sync resources. However, if you want to force the synchronization of all your Bare Metal Server resources, you can launch a Full sync. The Full sync is always possible on a Bare Metal Server. Launch the Full sync if the Delta sync is failing or if you want to reset all your Bare Metal Server resources because the server is not working correctly.
The Bare Metal Profiles section of the dashboard lists the available profiles on the Bare Metal Server. Depending on the options specified in the profile, the cached column displays whether the image associated to the selected profile is cached on the relay, or, if multicast was enabled, it displays whether the selected profile files are permanently cached on the Bare Metal Server. A green check mark indicates that files were successfully cached. For profiles with multicast enabled, a red warning with an "x" indicates that you must initiate a synchronization action on the Bare Metal Server. A yellow border triangle warning indicates that the corresponding image is not cached at the relay and will be copied when the profile is deployed for the first time. A red border triangle indicates that the caching status of the image cannot be determined.
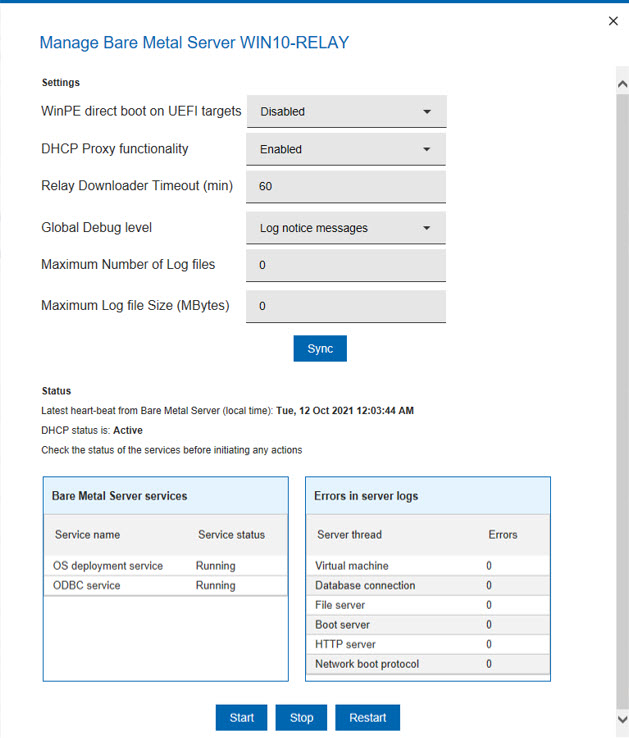
You can start, stop or restart the Bare Metal Server, and view if any errors were logged. The information displayed in this window is retrieved by Analysis 50. If the analysis fails to retrieve the current Bare Metal server settings, a warning message is displayed on the dashboard. To troubleshoot the problem, see Troubleshooting problems in retrieving Bare Metal Server Settings (Analysis 50 or Task 361). You can change any settings even if the retrieval of the current settings was not successful.
When you deploy a Bare Metal Profile for the first time, the images linked to the profile are cached (copied) on the relay. If network traffic is slow, the caching might take a long time and cause the deployment of the Bare Metal Profile to fail. The default timeout value is written in the bom.trc file. You can change this value in the Relay Downloader Timeout field. Specify the maximum time (in minutes) allowed to download an image from the Endpoint Management server to the relay if the image is not cached. Click Sync to update this value on the Bare Metal Server.
- Global Debug Level
- You can select the level of detail for the messages that are logged on the
Server log files. Choose on e of the following levels:
- 0: No output
- 1: Log errors only
- 2: Log errors and warnings
- 3: Log significant information (default)
- 4: Log notice messages
- 5: Log debugging messages
- 6: Log every possible detail
Note: Level 5 and Level 6 produce very large amounts of debugging information which might overload the Server. Use these levels with caution. - Maximum number of log files
- Specify the maximum number of log files that will be kept on the server. The default value is zero (0) which means that this parameter is not set.
- Maximum Log File size (in Megabytes)
- Specify the maximum size of the log files generated by the Bare Metal Server. The default value is zero (0), which means that circular logging is not enabled and any value specified for the number of log files is ignored. In this case, a single log file with no limit in size is created. If the value you specify is greater than zero, circular logging is enabled and a minimum of two log files are created and used, even if the log file number is set to zero. For example, if you specify 3 log files with a maximum size of 50 Megabytes, a first log file is created. When the first file reaches the specified limit, a second file is created, and again, a third. when all three files have reached the maximum size of 50 megabytes, the first one is overwritten.
- WinPE Direct Boot on Windows UEFI targets
- You can boot WinPE directly on UEFI targets that PXE boot during Windows
bare metal deployments. This allows computers with the Secure Boot firmware
option enabled to run bare metal deployments. By default, the direct boot
feature is disabled on the Bare Metal Servers. Select
enabled to allow Direct Boot of WinPE on Windows
UEFI targets during bare metal deployments. Note: In a WinPE Direct Boot enabled bare metal server, the needed drivers must be explicitly bound in the deployment engine binding matrix ("Current Manual Binding" column) in the Driver Bindings.
You can also change the Bare Metal Server settings by running Fixlet 361 on one or more Bare Metal Servers. Complete the form in the task and click Take Action.
Customizing cipher suites and protocols for TLS connections
According to OpenSSL syntax, the TLS 1.2 and TLS 1.3 protocols are enabled with
cipher suites set DEFAULT:!DH:!RC4:!EXP:!RC4-MD5:!RC4-SHA:-RSA:-SHA
by default in an encryption negotiation process for SSL connections. For more
information, visit https://www.openssl.org/docs/man3.1/man1/openssl-ciphers.html.
You can customize the cipher suites and protocols by using environment variables
RBO_CIPHERS, RBO_EXCLUDE_PROTOCOLS, and
RBO_FIPS_MODE.
- Set the environment variable
RBO_CIPHERSto select or exclude one or more cipher suites that the Bare Metal Server uses. For a complete list of allowed values and other information, see the supported syntax at above link.For example, to exclude
DESand3DES, setRBO_CIPHERS=DEFAULT:!DES:!3DES. - Set the environment variable
RBO_EXCLUDE_PROTOCOLSto exclude/enable protocols from the Bare Metal Server availability. The allowed values for RBO_EXCLUDE_PROTOCOLS are: TLSv1.0, TLSv1.1, TLSv1.2, and TLSv1.3. The only allowed separator is ":". SSLv2 and SSLv3 cannot be enabled.For example:- To allow only TLSv1.3 protocol, set
RBO_EXCLUDE_PROTOCOLS=TLSv1.0:TLSv1.1:TLSv1.2. - To enable all TLS protocols (that is TLS 1.0, TLS 1.1, TLS 1.2, and
TLS 1.3), set
RBO_EXCLUDE_PROTOCOLS=NONE.
- To allow only TLSv1.3 protocol, set
- From Bare Metal Server 7.1.120.31128, its possible to enable FIPS enforcement
for TLS connections by defining the environment variable
RBO_FIPS_MODE=true
Bare Metal Server database connection in a TLS 1.2 environment
For the 64-bit bare metal server running on SQL Express 2014 to work in a TLS 1.2 environment, enable the connection to the database by performing these steps:
- Open the local policy settings. Run
secpol.mscfrom an administrator command prompt. - Click .
- Run the
gpupdate /Forcecommand from an administrator command prompt. - Restart the computer for the changes to take effect.
Cleaning up after a failed installation or uninstallation
This task removes SQL Express database from the target system. Do not run this task if there are other applications using this database. Do not run this task on OS Deployment Servers that are listed as installed in the Bare Metal OS Deployment Server Manager dashboard. On these servers, you must first run an uninstall action.
Bare Metal Server SSL Certificates
Bare Metal Server for the SSL communication uses a self-signed certificate that is automatically generated by default at the first start of its process.
If you want to replace this default certificate with a custom one or delete the current certificate, do the following steps:
- Stop BigFix Bare Metal Server service.
- Open a command line shell and change the directory to the BigFix Bare Metal Server binaries directory. For example: C:\Program Files\BigFix OSD.
- Run the following commands:
- To import a new certificate and its private key:
rembo.exe -d -v 4 -cert “<certificate filename with fullpath>” “<private key filename with fullpath>” <private key passphrase> -exitwhere the certificate is a .crt file and its private key is a .key file, the following string represents a certificate and private key:- Certificate
-
-----BEGIN CERTIFICATE----- <<base64 string>> -----END CERTIFICATE----- - Private key
-
-----BEGIN PRIVATE KEY-----
<<base64 string>>
-----END PRIVATE KEY-----
- To delete the current certificate and its private key, either the
previously imported custom certificate or the default self-signed certificate:
rembo.exe -d -v 4 -delcerts
- To import a new certificate and its private key:
- Restart BigFix Bare Metal Server
service.Note: If the Bare Metal Server has no certificate at its start, it generates a new self-signed certificate.